
使用您最喜欢的AI助手总结文档,并引用此页面和AI提供商
版本历史
- "将「实时同步」章节移动到独立页面(live-sync.md),此处仅保留简短介绍和链接"v9.0.02026/7/8
- "添加实时同步文档"v6.0.12025/9/22
- "用 `liveSync` 字段替换 `hotReload` 字段"v6.0.02025/9/4
- "初始化历史记录"v5.5.102025/6/29
此页面的内容已使用 AI 翻译。
查看英文原文的最新版本如果您有改善此文档的想法,请随时通过在GitHub上提交拉取请求来贡献。
文档的 GitHub 链接复制文档 Markdown 到剪贴板
Intlayer 内容管理系统(CMS)文档
Intlayer CMS 是一个应用程序,允许您将 Intlayer 项目的内容外部化。
为此,Intlayer 引入了“远程字典”的概念。
目录
理解远程字典
Intlayer 区分“本地”字典和“远程”字典。
“本地”字典是指在您的 Intlayer 项目中声明的字典。例如按钮的声明文件,或您的导航栏。在这种情况下,将内容外部化没有意义,因为这些内容通常不需要频繁更改。
“远程”字典是通过 Intlayer CMS 管理的字典。它可以让您的团队直接在网站上管理内容,同时也支持使用 A/B 测试功能和 SEO 自动优化。
可视化编辑器与 CMS
Intlayer Visual 编辑器是一个工具,允许您在本地字典的可视化编辑器中管理内容。一旦进行更改,内容将被替换到代码库中。这意味着应用程序将被重新构建,页面将重新加载以显示新内容。
相比之下,Intlayer CMS 是一个工具,允许您在远程字典的可视化编辑器中管理内容。一旦进行更改,内容将不会影响您的代码库。网站将自动显示更改后的内容。
集成
有关如何安装该包的更多详细信息,请参阅下面的相关部分:
与 Next.js 集成
对于与 Next.js 的集成,请参阅安装指南。
与 Create React App 集成
对于与 Create React App 的集成,请参阅安装指南。
与 Vite + React 集成
对于与 Vite + React 的集成,请参阅安装指南。
配置
运行以下命令登录 Intlayer CMS:
复制代码到剪贴板
这将打开您的默认浏览器以完成身份验证过程并接收使用 Intlayer 服务所需的凭据(客户端 ID 和客户端密钥)。
在您的 Intlayer 配置文件中,您可以自定义 CMS 设置:
复制代码到剪贴板
import type { IntlayerConfig } from "intlayer";

const config: IntlayerConfig = {
  // ... 其他配置设置
  editor: {
    /**
     * 必填
     *
     * 应用程序的 URL。
     * 这是可视化编辑器所针对的 URL。
     */
    applicationURL: process.env.INTLAYER_APPLICATION_URL,

    /**
     * 必填
     *
     * 启用编辑器需要客户端 ID 和客户端密钥。
     * 它们用于识别正在编辑内容的用户。
     * 可以通过在 Intlayer 控制面板 - 项目 (https://app.intlayer.org/projects) 中创建新客户端来获取。
     * clientId: process.env.INTLAYER_CLIENT_ID,
     * clientSecret: process.env.INTLAYER_CLIENT_SECRET,
     */
    clientId: process.env.INTLAYER_CLIENT_ID,
    clientSecret: process.env.INTLAYER_CLIENT_SECRET,

    /**
     * 可选
     *
     * 如果您自行托管 Intlayer CMS,您可以设置 CMS 的 URL。
     *
     * Intlayer CMS 的 URL。
     * 默认情况下,设置为 https://intlayer.org
     */
    cmsURL: process.env.INTLAYER_CMS_URL,

    /**
     * 可选
     *
     * 如果您自行托管 Intlayer CMS,您可以设置后端的 URL。
     *
     * Intlayer CMS 的 URL。
     * 默认情况下,设置为 https://back.intlayer.org
     */
    backendURL: process.env.INTLAYER_BACKEND_URL,
  },
};

export default config;
如果您没有客户端 ID 和客户端密钥,可以通过在Intlayer 控制面板 - 项目中创建新客户端来获取。
要查看所有可用参数,请参考配置文档。
使用 CMS
推送您的配置
要配置 Intlayer CMS,您可以使用intlayer CLI命令。
复制代码到剪贴板
如果您在intlayer.config.ts配置文件中使用了环境变量,可以通过--env参数指定所需的环境:
复制代码到剪贴板
此命令会将您的配置上传到 Intlayer CMS。
推送字典
要将您的本地化字典转换为远程字典,您可以使用intlayer CLI命令。
复制代码到剪贴板
如果您在intlayer.config.ts配置文件中使用环境变量,可以使用--env参数指定所需的环境:
复制代码到剪贴板
此命令会上传您的初始内容字典,使其可通过 Intlayer 平台进行异步获取和编辑。
编辑字典
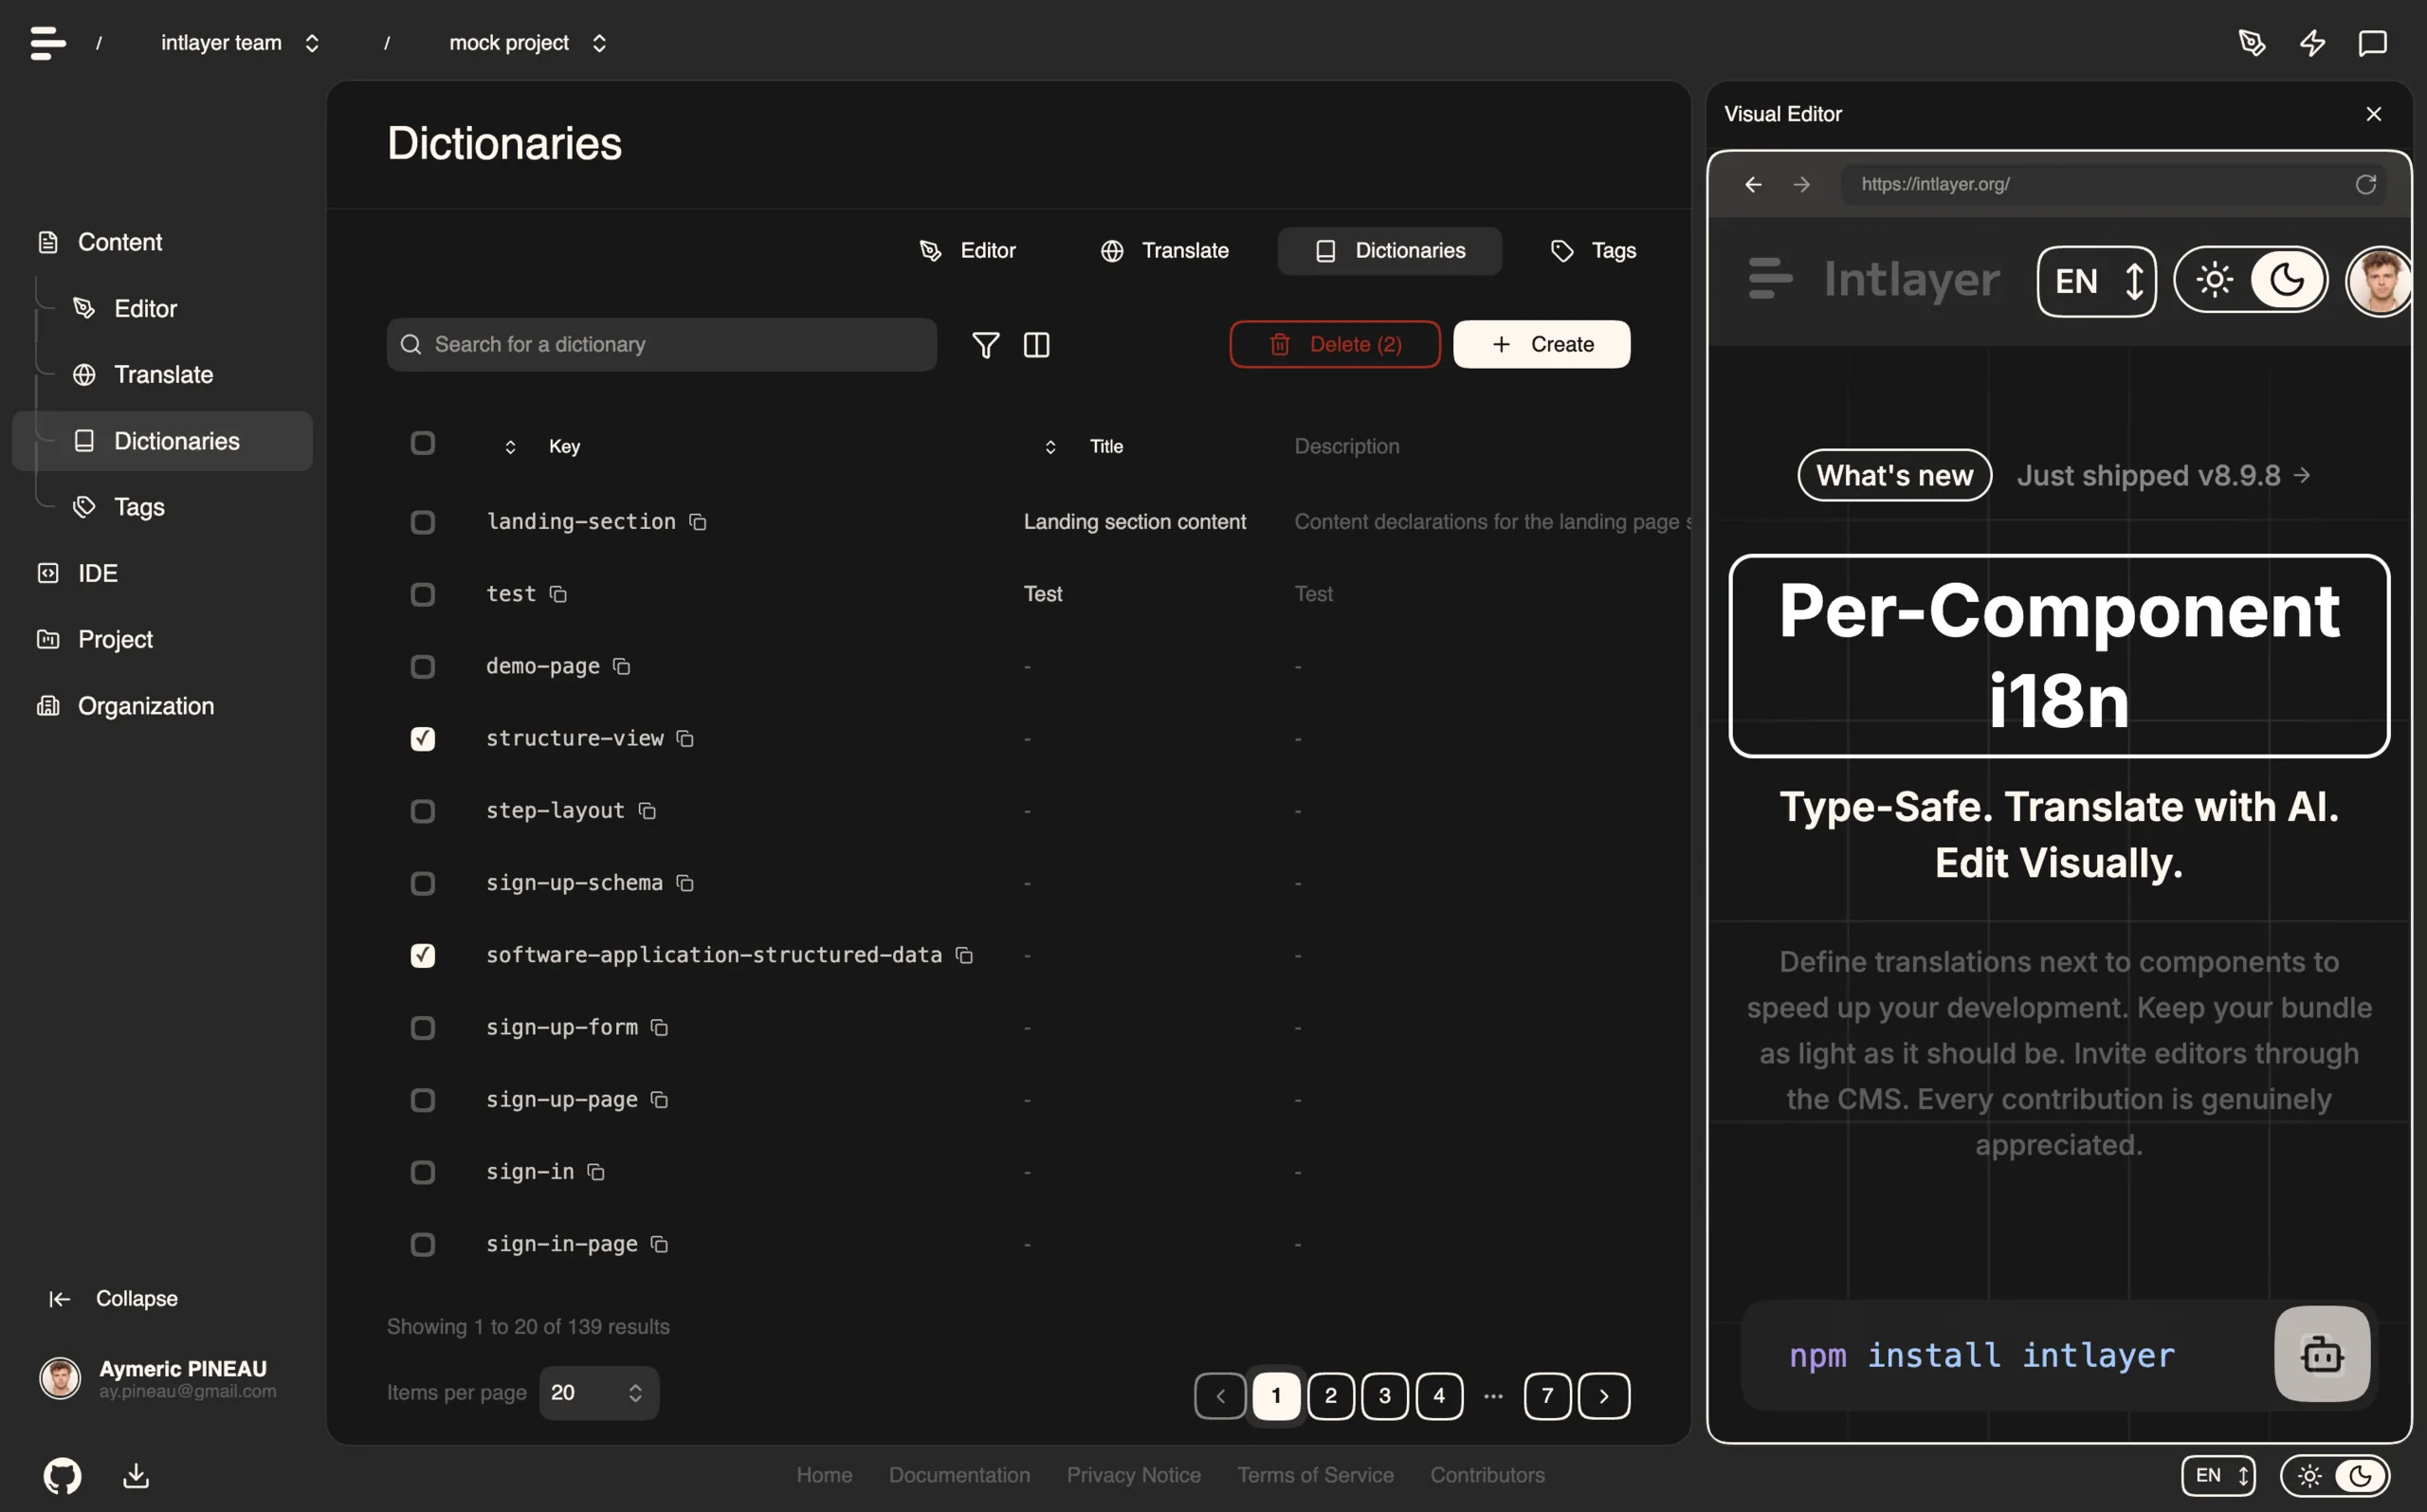
然后,您将能够在 Intlayer CMS 中查看和管理您的字典。
使用 @intlayer/api SDK 进行编程访问
除了 CLI 和可视化编辑器,Intlayer 在 @intlayer/api 包中提供了一个类型化的 SDK。它让你可以将 CMS 视为一个无头内容数据库:你可以直接从自己的应用程序、脚本或 CI 流水线中获取项目、获取字典,以及推送或更新它们。
SDK 为你处理身份验证。只要你的 clientId 和 clientSecret 可用(在你的 Intlayer 配置或环境中),它就会自动获取和刷新 OAuth2 访问令牌,并对每个请求进行签名。
安装
复制代码到剪贴板
工作原理:身份验证器 + 端点
SDK 被拆分为两个独立的导入,目的是保持您的包体积小:
createIntlayerCMS:创建一个轻量级身份验证器。它只携带凭证和托管的访问令牌;对任何特定的域一无所知。dictionaryEndpoint、projectEndpoint等,按域名的端点绑定器,每个都从自己的子路径导入(@intlayer/api/dictionary、@intlayer/api/project等)。您将身份验证器传递给您需要的端点。
因为每个端点都是单独导入的,您的包只包含您实际使用的域,导入 dictionaryEndpoint 永远不会拉入项目、AI 或任何其他域客户端。
复制代码到剪贴板
WARNING CMS 凭证(clientId/clientSecret)授予您的内容写入访问权限。只在服务器端创建身份验证器(服务器操作、路由处理程序、脚本、CI)。永远不要将其导入客户端代码或向浏览器暴露您的凭证。
如果您更倾向于不依赖构建时配置,请显式传递凭证:
复制代码到剪贴板
通过在 Intlayer 仪表板 - 项目中创建新的访问密钥来获取您的凭证。
获取项目
复制代码到剪贴板
获取字典
复制代码到剪贴板
推送和更新字典
使用 CMS 作为数据库来写回内容:
复制代码到剪贴板
提示:重复使用绑定的端点以避免重复代码:
typescript复制代码复制代码到剪贴板
提取单个方法
每个端点方法都已经过身份验证且独立(它包含自己的令牌处理),因此您可以提取一个并将其传递,例如将其注入作为依赖项:
复制代码到剪贴板
实时同步
实时同步让您的应用在运行时反映 CMS 内容的更改。无需重新构建或重新部署。启用后,更新会被流式传输到实时同步服务器,刷新您的应用读取的字典。
完整的设置指南(启用方式、启动 Live Sync 服务器、本地开发工作流程和限制条件)请参阅 Live Sync 文档。
自托管
Intlayer 可以完全在您自己的基础设施上运行。一条命令可以使用 Docker Compose 启动完整的堆栈(仪表板、API、数据库、对象存储和电子邮件):
复制代码到剪贴板
有关完整的设置指南、环境变量参考、升级说明和备份/恢复过程,请参阅自托管指南。
调试
如果您遇到 CMS 的任何问题,请检查以下内容:
应用程序正在运行。
editor配置在您的 Intlayer 配置文件中设置正确。- 必需字段:
- 应用程序 URL 应该与您在编辑器配置中设置的 URL 相匹配(
applicationURL)。 - CMS URL
- 应用程序 URL 应该与您在编辑器配置中设置的 URL 相匹配(
- 必需字段:
确保项目配置已推送到 Intlayer CMS。
可视化编辑器使用 iframe 来显示您的网站。确保您的网站的内容安全策略 (CSP) 允许 CMS URL 作为
frame-ancestors(默认为 'https://app.intlayer.org')。检查编辑器控制台中的任何错误。
常见问题
可视化编辑器 编辑的是本地字典,并将修改直接写回您的代码库中,因此应用需要重新构建,并且更改需要走正常的代码审查和部署流程。而 CMS 编辑的是远程字典:修改完全不触碰您的代码库,运行中的站点无需重新部署即可直接生效。团队通常两者搭配使用:开发者维护的内容使用编辑器,市场团队每周频繁更新的内容使用 CMS。
远少于基于命名空间的方案,因为页面永远不会下载它不渲染的语言目录。服务端渲染的标记在服务端直接解析内容,而构建时编译器将 useIntlayer 调用替换为组件使用的确切字典条目,因此未使用的键和未使用的语言都会被自动丢弃。动态字典 会按语言环境拆分剩余内容。与常规替代方案相比,Intlayer 可将 bundle 和页面体积减少高达 50%。请参阅 Bundle 体积优化 和 性能基准。
可以,有两条迁移路径。您可以使用 i18next 迁移指南 或 next-intl 迁移指南 逐步迁移内容。或者,您可以完全保留当前的 API:兼容性适配器 公开与 i18next、react-i18next、next-intl、next-i18next、react-intl、use-intl、vue-i18n 和 Lingui 完全相同的 API,但底层由 Intlayer 字典驱动,因此只需更改导入语句,组件代码无需修改。
可以。JSON 同步插件 将您的 /messages/{locale}/{namespace}.json 文件作为单一真实来源(source of truth),并双向生成 Intlayer 字典。PO 同步插件 对 gettext 目录执行相同的操作,而 按语言环境组织的文件 允许您按语言拆分内容,而不是将所有语言打包到一个文件中。
不需要。运行 npx intlayer extract,Intlayer 会读取您的源码文件,提取面向用户的字符串,并在每个组件旁边生成 .content 文件,这样您只需审查 diff,而无需手动逐一复制字符串到语言目录中。请参阅 extract 命令。
如需全自动流程,Intlayer Compiler 可以在构建时对 JSX、TSX、Vue 和 Svelte 源码执行相同操作,在每次更改时自动生成字典,完全无需手动维护键名。它通过静态分析工作,因此仅在运行时存在的字符串无法被捕获,并且需要少量注解以区分用户文本和应用程序逻辑。
共有 5 个工具,均为可选:
- VS Code 扩展:从
useIntlayer键跳转到声明它的内容文件,从组件中提取内容,并从命令面板或专属的 Intlayer 选项卡运行 build、fill、test、push 和 pull。 - LSP 服务器:在任何支持 LSP 的编辑器中提供相同的感知能力,支持跳转到定义、查找所有引用、悬停预览翻译值、键和字段的自动补全,以及在键未声明时发出警告。它还可以解析
i18next、react-i18next、next-intl和use-intl调用,助力平滑迁移。 - MCP 服务器:向 Cursor、VS Code、Claude Desktop、Claude Code 和 ChatGPT 公开 Intlayer 文档与 CLI,使 AI 助手能够基于最新文档进行准确回答,并能自行运行
intlayer fill等命令。 - Agent Skills:针对特定领域的技能(如
intlayer-config、intlayer-cli和intlayer-content,以及每个框架对应的专属技能),教导 AI 代理您的路由配置和内容节点类型。 - ESLint 插件:
no-raw-text规则标记硬编码字符串,并提供针对静态字典键和未使用内容的额外规则。