
このページとあなたの好きなAIアシスタントを使ってドキュメントを要約します
バージョン履歴
- "Solid の useIntlayer API の使用法を直接プロパティアクセスに更新"v8.9.02026/5/4
- "initコマンドを追加"v7.5.92025/12/30
- "履歴の初期化"v5.5.102025/6/29
このページのコンテンツはAIを使用して翻訳されました。
英語の元のコンテンツの最新バージョンを見るIf you have an idea for improving this documentation, please feel free to contribute by submitting a pull request on GitHub.
GitHub link to the documentationCopy doc Markdown to clipboard
IntlayerでVite and Preactを翻訳する | 国際化(i18n)
このパッケージは開発中です。詳細はissueをご覧ください。Intlayer for Preact に関心がある場合は、issue に「いいね」をして興味を示してください。
GitHub のアプリケーションテンプレートもご覧ください。
目次
代替手段ではなく Interlayer を使用する理由
「preact-i18n」や「i18next」などの主要なソリューションと比較して、Intlayer は次のような統合された最適化を備えたソリューションです。
Preact を完全にカバー
Intlayer は、コンポーネント レベルのコンテンツ スコープ、遅延読み込み、および国際化のスケーリング (i18n) に必要なすべての機能を提供することで、Preact と完全に連携するように最適化されています。
バンドルサイズ
大量の JSON ファイルをページにロードするのではなく、必要なコンテンツのみをロードします。 Intlayer は、バンドルとページのサイズを最大 50% 削減するのに役立ちます。
保守性
アプリケーションのコンテンツのスコープを設定すると、大規模なアプリケーションの メンテナンスが容易になります。コンテンツ コードベース全体を確認するという精神的な負担を負うことなく、単一の機能フォルダーを複製または削除できます。さらに、Intlayer は完全に型指定されており、コンテンツの正確性を保証します。
AI エージェント
コンテンツを同じ場所に配置すると、大規模言語モデル (LLM) によって 必要なコンテキストが削減されます。 Intlayer には、翻訳の欠落をテストする CLI、LSP、MCP などのツール スイートも付属しています。および エージェント スキル により、AI エージェントの開発者エクスペリエンス (DX) がさらにスムーズになります。
オートメーション
AI プロバイダーの費用で、選択した LLM を使用して CI/CD パイプラインで自動化を変換します。 Intlayer は、コンテンツ抽出を自動化する コンパイラー と、バックグラウンドでの翻訳を支援する Web プラットフォーム も提供します。
パフォーマンス
大量の JSON ファイルをコンポーネントに接続すると、パフォーマンスと反応性の問題が発生する可能性があります。 Intlayer は、ビルド時のコンテンツの読み込みを最適化します。
非開発によるスケーリング
Intlayer は単なる i18n ソリューションではなく、自己ホスト型 ビジュアル エディター と 完全な CMS を提供します。 リアルタイムで多言語コンテンツを管理できるようになり、翻訳者、コピーライター、その他のチーム メンバーとのコラボレーションがシームレスになります。コンテンツはローカルおよび/またはリモートに保存できます。
Vite と Preact アプリケーションで Intlayer をセットアップするステップバイステップガイド
GitHub のアプリケーションテンプレートを参照してください。
依存関係のインストール
npm を使用して必要なパッケージをインストールします:
コードをクリップボードにコピー
npx intlayer@canary init --interactive # v9# npx intlayer init # v8--interactiveフラグはオプションです。AI エージェントの場合はintlayer-cli initを使用してください。
このコマンドは、あなたの環境を検出し、必要なパッケージをインストールします。例えば:
コードをクリップボードにコピー
npm install intlayer preact-intlayernpm install vite-intlayer --save-devintlayer
設定管理、翻訳、コンテンツ宣言、トランスパイル、および CLI コマンドのための国際化ツールを提供するコアパッケージです。
preact-intlayer Intlayer と Preact アプリケーションを統合するパッケージです。Preact の国際化のためのコンテキストプロバイダーとフックを提供します。
vite-intlayer Intlayer をVite バンドラーと統合するための Vite プラグイン、およびユーザーの優先ロケールを検出し、Cookie を管理し、URL リダイレクトを処理するミドルウェアが含まれています。
プロジェクトの構成
アプリケーションの言語を構成するための設定ファイルを作成します:
コードをクリップボードにコピー
import { Locales, type IntlayerConfig } from "intlayer";

const config: IntlayerConfig = {
  internationalization: {
    locales: [
      Locales.ENGLISH,
      Locales.FRENCH,
      Locales.SPANISH,
      // その他のロケール
    ],
    defaultLocale: Locales.ENGLISH,
  },
  routing: {
    mode: "prefix-no-default", // デフォルト: デフォルトロケール以外のすべてのロケールにプレフィックスを付ける
    storage: ["cookie", "header"], // デフォルト: Cookie にロケールを保存し、ヘッダーから検出する
  },
};

export default config;
この設定ファイルを通じて、ローカライズされた URL、ルーティング モード、ストレージ オプション、Cookie 名、コンテンツ宣言の場所と拡張子、コンソールで Intlayer ログを無効にするなど、その他多くの設定を行うことができます。利用可能なパラメーターの完全なリストについては、設定ドキュメントを参照してください。
Vite 構成に Intlayer を統合
設定に intlayer プラグインを追加します。
コードをクリップボードにコピー
import { defineConfig } from "vite";
import preact from "@preact/preset-vite";
import { intlayer } from "vite-intlayer";

// https://vitejs.dev/config/
export default defineConfig({
  plugins: [preact(), intlayer()],
});
intlayer() Vite プラグインは、Intlayer を Vite と統合するために使用されます。コンテンツ宣言ファイルのビルドを確保し、開発モードでそれらを監視します。Vite アプリケーション内で Intlayer 環境変数を定義します。さらに、パフォーマンスを最適化するためのエイリアスを提供します。コンテンツを宣言
翻訳を保存するためのコンテンツ宣言を作成および管理します:
コードをクリップボードにコピー
import { t, type Dictionary } from "intlayer";
import type { ComponentChildren } from "preact";
const appContent = {
key: "app",
content: {
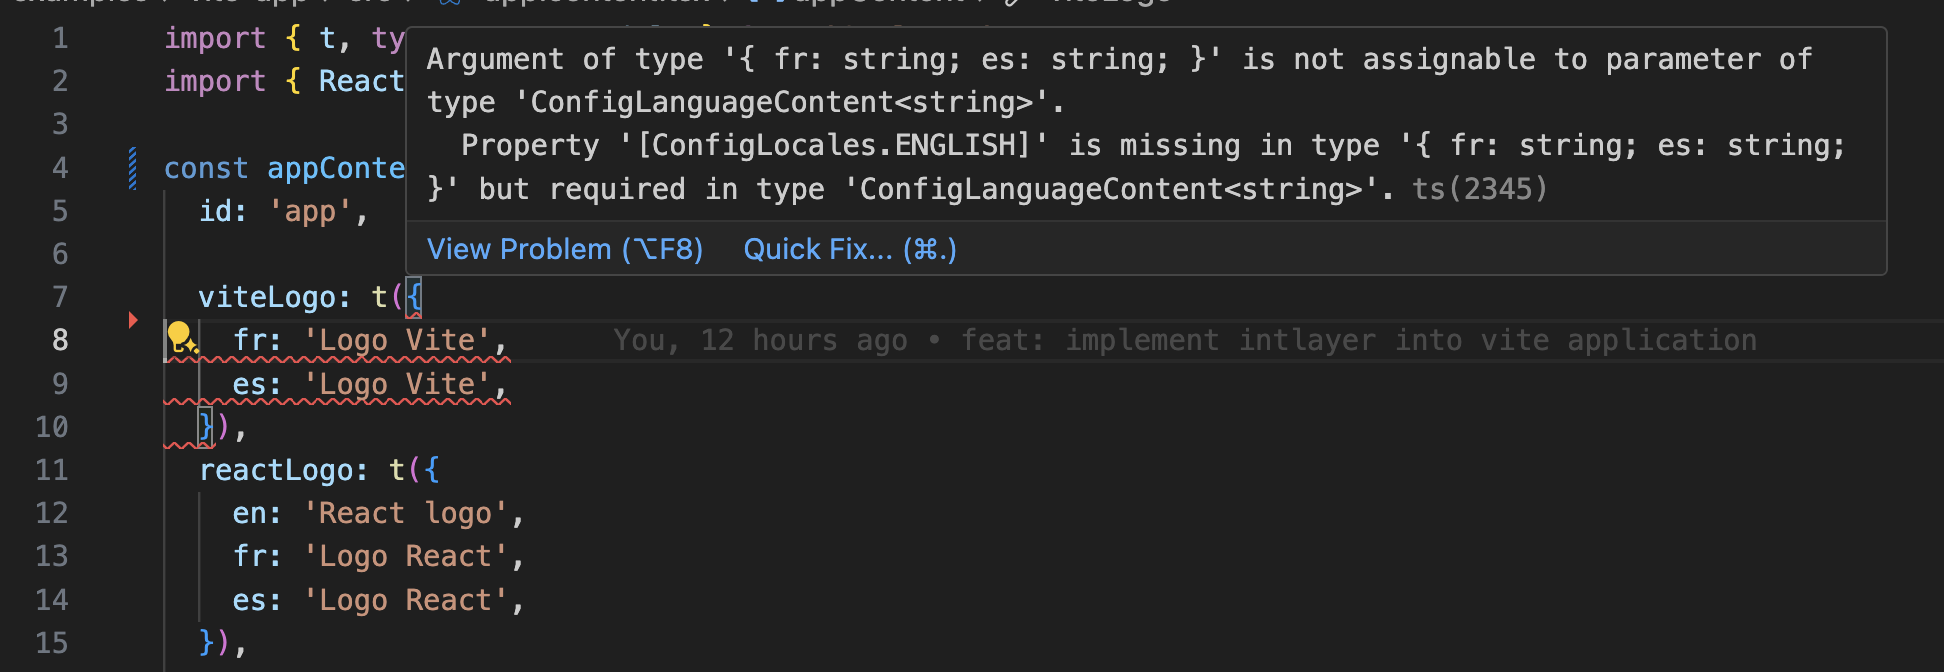
viteLogo: t({
ja: "Vite ロゴ",
en: "Vite logo",
fr: "Logo Vite",
es: "Logo Vite",
}),
preactLogo: t({
ja: "Preact ロゴ",
en: "Preact logo",
fr: "Logo Preact",
es: "Logo Preact",
}),
title: "Vite + Preact",
count: t({
ja: "カウント: ",
en: "count is ",
fr: "le compte est ",
es: "el recuento es ",
}),
edit: t<ComponentChildren>({
ja: (
<>
<code>src/app.tsx</code> を編集して保存し、HMR をテストしてください
</>
),
en: (
<>
Edit <code>src/app.tsx</code> and save to test HMR
</>
),
fr: (
<>
Éditez <code>src/app.tsx</code> et enregistrez pour tester HMR
</>
),
es: (
<>
Edita <code>src/app.tsx</code> y guarda para probar HMR
</>
),
}),
readTheDocs: t({
ja: "詳細については、Vite と Preact のロゴをクリックしてください",
en: "Click on the Vite and Preact logos to learn more",
fr: "Cliquez sur les logos Vite et Preact pour en savoir plus",
es: "Haga clic en los logotipos de Vite y Preact para obtener más información",
}),
},
} satisfies Dictionary;
export default appContent;コンテンツ宣言は、contentDirディレクトリ (デフォルトでは./src) に含まれており、コンテンツ宣言ファイルの拡張子 (デフォルトでは.content.{json,ts,tsx,js,jsx,mjs,cjs,md,mdx,yaml,yml}) と一致する限り、アプリケーションのどこでも定義できます。
詳細については、コンテンツ宣言ドキュメントを参照してください。
コンテンツファイルに TSX コードが含まれている場合、import { h } from "preact"; をインポートするか、Preact 用に JSX pragma が正しく設定されていることを確認する必要があります。
コードで Intlayer を利用
アプリケーション全体でコンテンツ辞書にアクセスします:
コードをクリップボードにコピー
import { useState } from "preact/hooks";
import type { FunctionalComponent } from "preact";
import preactLogo from "./assets/preact.svg"; // preact.svg があると仮定
import viteLogo from "/vite.svg";
import "./app.css"; // CSS ファイルが app.css という名前であると仮定
import { IntlayerProvider, useIntlayer } from "preact-intlayer";

const AppContent: FunctionalComponent = () => {
  const [count, setCount] = useState(0);
  const content = useIntlayer("app");

  return (
    <>
      <div>
        <a href="https://vitejs.dev" target="_blank">
          <img src={viteLogo} class="logo" alt={content.viteLogo.value} />
        </a>
        <a href="https://preactjs.com" target="_blank">
          <img
            src={preactLogo}
            class="logo preact"
            alt={content.preactLogo.value}
          />
        </a>
      </div>
      <h1>{content.title}</h1>
      <div class="card">
        <button onClick={() => setCount((count) => count + 1)}>
          {content.count}
          {count}
        </button>
        <p>{content.edit}</p>
      </div>
      {/* Markdown コンテンツ */}
      <div>{content.myMarkdownContent}</div>

      {/* HTML コンテンツ */}
      <div>{content.myHtmlContent}</div>

      <p class="read-the-docs">{content.readTheDocs}</p>
    </>
  );
};

const App: FunctionalComponent = () => (
  <IntlayerProvider>
    <AppContent />
  </IntlayerProvider>
);

export default App;alt、title、href、aria-labelなどのstring属性でコンテンツを使用したい場合、次のように関数の値を使用できます:
htmlコードをコピーコードをクリップボードにコピー
<img src="{content.image.src.value}" alt="{content.image.value}" /><img src="{content.image.src.toString()}" alt="{content.image.toString()}" /><img src="{String(content.image.src)}" alt="{String(content.image)}" />
注: Preact では、classNameは通常classとして書かれます。
useIntlayerフック の詳細については、ドキュメントを参照してください (preact-intlayerの API は同様です)。
アプリがすでに存在する場合、Intlayer Compiler および extract コマンドを使用して、数秒で数千のコンポーネントを変換できます。
コンテンツの言語を変更
オプションコンテンツの言語を変更するには、useLocale フックで提供される setLocale 関数を使用できます。この関数により、アプリケーションのロケールを設定し、それに応じてコンテンツを更新できます。
コードをクリップボードにコピー
import type { FunctionalComponent } from "preact";
import { Locales } from "intlayer";
import { useLocale } from "preact-intlayer";

const LocaleSwitcher: FunctionalComponent = () => {
  const { setLocale } = useLocale();

  return (
    <button onClick={() => setLocale(Locales.ENGLISH)}>言語を英語に変更</button>
  );
};

export default LocaleSwitcher;useLocaleフックの詳細については、ドキュメントを参照してください (preact-intlayerの API は同様です)。
アプリケーションにローカライズされたルーティングを追加
オプションこのステップの目的は、各言語にユニークなルートを作成することです。これは SEO とユーザーフレンドリーな URL に有効です。 例:
コードをクリップボードにコピー
- https://example.com/about- https://example.com/es/about- https://example.com/fr/aboutデフォルトでは、ルートはデフォルトロケールに対してプレフィックス付きになりません。デフォルトロケールにプレフィックスを付けたい場合は、設定でrouting.modeオプションを"prefix-all"に設定できます。詳細については、設定ドキュメントを参照してください。
アプリケーションにローカライズされたルーティングを追加するには、アプリケーションのルートをラップし、ロケールベースのルーティングを処理する LocaleRouter コンポーネントを作成できます。preact-iso を使用した例を次に示します:
コードをクリップボードにコピー
import { localeMap } from "intlayer";
import { IntlayerProvider } from "preact-intlayer";
import { LocationProvider, Router, Route } from "preact-iso";
import type { ComponentChildren, FunctionalComponent } from "preact";

/**
 * ロケール固有のルートをセットアップするルーターコンポーネント。
 * preact-iso を使用してナビゲーションを管理し、ローカライズされたコンポーネントをレンダリングします。
 */
export const LocaleRouter: FunctionalComponent<{
  children: ComponentChildren;
}> = ({ children }) => (
  <LocationProvider>
    <Router>
      {localeMap(({ locale, urlPrefix }) => ({ locale, urlPrefix }))
        .sort((a, b) => b.urlPrefix.length - a.urlPrefix.length)
        .map(({ locale, urlPrefix }) => (
          <Route
            key={locale}
            path={`${urlPrefix}/:rest*`}
            component={() => (
              <IntlayerProvider locale={locale}>{children}</IntlayerProvider>
            )}
          />
        ))}
    </Router>
  </LocationProvider>
);
その後、アプリケーションで LocaleRouter コンポーネントを使用できます:
コードをクリップボードにコピー
import { LocaleRouter } from "./components/LocaleRouter";
import type { FunctionalComponent } from "preact";

// ... AppContent コンポーネント

const App: FunctionalComponent = () => (
  <LocaleRouter>
    <AppContent />
  </LocaleRouter>
);

export default App;並行して、intlayerProxy を使用してサーバーサイドルーティングをアプリケーションに追加することもできます。このプラグインは、URL に基づいて現在のロケールを自動的に検出し、適切なロケール Cookie を設定します。ロケールが指定されていない場合、プラグインはユーザーのブラウザ言語設定に基づいて最も適切なロケールを決定します。ロケールが検出されない場合、デフォルトロケールにリダイレクトします。
本番環境でintlayerProxyを使用するには、vite-intlayerパッケージをdevDependenciesからdependenciesに切り替える必要があることに注意してください。
Intlayer v9 以降、intlayerProxy()はintlayer()プラグインに直接バンドルされ、routing.enableProxyオプション (デフォルトでtrue) を通じてデフォルトで有効になっています。以下に示すように個別に登録することはオプションになりました — これは後方互換性のため、およびプラグインの順序を制御する必要があるセットアップのために保持されます。オプトアウトするにはrouting.enableProxy: falseを設定してください。v9 リリースノートを参照してください。
コードをクリップボードにコピー
import { defineConfig } from "vite";import { intlayer } from "vite-intlayer";import preact from "@preact/preset-vite";// https://vitejs.dev/config/export default defineConfig({ plugins: [ preact(), intlayer({ proxy: { ignore: (req) => req.url?.startsWith("/api"), }, }), ],});ロケール変更時に URL を変更
オプションロケール変更時に URL を変更するには、useLocale フックで提供される onLocaleChange prop を使用できます。並行して、preact-iso の useLocation から route メソッドを使用して URL パスを更新できます。
コードをクリップボードにコピー
import { useLocation } from "preact-iso";
import {
  Locales,
  getHTMLTextDir,
  getLocaleName,
  getLocalizedUrl,
} from "intlayer";
import { useLocale } from "preact-intlayer";
import type { FunctionalComponent } from "preact";

const LocaleSwitcher: FunctionalComponent = () => {
  const { url, route } = useLocation();
  const { locale, availableLocales, setLocale } = useLocale({
    onLocaleChange: (newLocale) => {
      // 更新されたロケールで URL を構築
      // 例: /es/about?foo=bar
      const pathWithLocale = getLocalizedUrl(url, newLocale);

      // URL パスを更新
      route(pathWithLocale, true); // true は置換用
    },
  });

  return (
    <div>
      <button popovertarget="localePopover">{getLocaleName(locale)}</button>
      <div id="localePopover" popover="auto">
        {availableLocales.map((localeItem) => (
          <a
            href={getLocalizedUrl(url, localeItem)}
            hreflang={localeItem}
            aria-current={locale === localeItem ? "page" : undefined}
            onClick={(e) => {
              e.preventDefault();
              setLocale(localeItem);
              // ロケール設定後のプログラム的なナビゲーションは onLocaleChange で処理されます
            }}
            key={localeItem}
          >
            <span>
              {/* ロケール - 例: FR */}
              {localeItem}
            </span>
            <span>
              {/* 自身のロケールでの言語 - 例: Français */}
              {getLocaleName(localeItem, localeItem)}
            </span>
            <span dir={getHTMLTextDir(localeItem)} lang={localeItem}>
              {/* 現在のロケールでの言語 - 例: 現在のロケールが Locales.SPANISH に設定されている場合の Francés */}
              {getLocaleName(localeItem, locale)}
            </span>
            <span dir="ltr" lang={Locales.ENGLISH}>
              {/* 英語での言語 - 例: French */}
              {getLocaleName(localeItem, Locales.ENGLISH)}
            </span>
          </a>
        ))}
      </div>
    </div>
  );
};

export default LocaleSwitcher;
ドキュメント参照:
-useLocaleフック (preact-intlayerの API は同様)> -getLocaleNameフック> -getLocalizedUrlフック> -getHTMLTextDirフック> -hreflang属性> -lang属性> -dir属性> -aria-current属性> - Popover API
以下は、説明とコード例が改善された更新版ステップ 9です:
HTML言語と方向属性を切り替え
オプションアプリケーションが複数の言語をサポートしている場合、現在のロケールと一致するように <html> タグの lang 属性と dir 属性を更新することが重要です。これにより以下が確保されます:
- アクセシビリティ: スクリーンリーダーとアシスティブテクノロジーは、コンテンツを正確に発音および解釈するために正しい
lang属性に依存しています。 - テキストレンダリング:
dir(方向) 属性は、テキストが適切な順序 (例: 英語の場合は左から右、アラビア語またはヘブライ語の場合は右から左) でレンダリングされることを保証し、可読性に不可欠です。 - SEO: 検索エンジンは
lang属性を使用してページの言語を判定し、検索結果に適切なローカライズされたコンテンツを配信するのに役立ちます。
ロケール変更時にこれらの属性を動的に更新することで、サポートされているすべての言語でユーザーに一貫性のあるアクセス可能なエクスペリエンスを保証します。
フックの実装
HTML属性を管理するカスタムフックを作成します。このフックはロケール変更をリッスンし、それに応じて属性を更新します:
コードをクリップボードにコピー
import { useEffect } from "preact/hooks";
import { useLocale } from "preact-intlayer";
import { getHTMLTextDir } from "intlayer";

/**
 * 現在のロケールに基づいて HTML <html> 要素の `lang` および `dir` 属性を更新します。
 * - `lang`: ブラウザと検索エンジンにページの言語を通知します。
 * - `dir`: 正しい読み取り順序を確保します(例:英語の場合は 'ltr'、アラビア語の場合は 'rtl')。
 *
 * この動的更新は、適切なテキストレンダリング、アクセシビリティ、およびSEOに不可欠です。
 */
export const useI18nHTMLAttributes = () => {
  const { locale } = useLocale();

  useEffect(() => {
    // 言語属性を現在のロケールに更新します。
    document.documentElement.lang = locale;

    // 現在のロケールに基づいてテキスト方向を設定します。
    document.documentElement.dir = getHTMLTextDir(locale);
  }, [locale]);
};
アプリケーションでフックを使用する
ロケールが変更されるたびにHTML属性が更新されるように、フックをメインコンポーネントに統合します:
コードをクリップボードにコピー
import type { FunctionalComponent } from "preact";
import { IntlayerProvider } from "preact-intlayer"; // AppContentが必要な場合、useIntlayerが既にインポートされています
import { useI18nHTMLAttributes } from "./hooks/useI18nHTMLAttributes";
import "./app.css";
// ステップ5でのAppContent定義

const AppWithHooks: FunctionalComponent = () => {
  // フックを適用して、ロケールに基づいて<html>タグのlangおよびdir属性を更新します。
  useI18nHTMLAttributes();

  // AppContentはステップ5からのメインコンテンツ表示コンポーネントと仮定します
  return <AppContent />;
};

const App: FunctionalComponent = () => (
  <IntlayerProvider>
    <AppWithHooks />
  </IntlayerProvider>
);

export default App;
これらの変更を適用することで、アプリケーションは以下のようになります:
- 言語(
lang)属性が現在のロケールを正しく反映することを確保し、これはSEOとブラウザの動作にとって重要です。 - ロケールに従ってテキスト方向(
dir)を調整し、異なる読む順序を持つ言語の読みやすさと使いやすさを向上させます。 - よりアクセシブルな体験を提供します。補助技術はこれらの属性に依存して最適に機能するためです。
ローカライズされたLinkコンポーネントの作成
オプションアプリケーションのナビゲーションが現在のロケールを尊重することを確保するために、カスタムLinkコンポーネントを作成できます。このコンポーネントは、内部URLに現在の言語を自動的にプレフィックスします。
この動作は複数の理由で有用です:
- SEOとユーザー体験:ローカライズされたURLは、検索エンジンが言語固有のページを正しくインデックスするのに役立ち、ユーザーに優先言語のコンテンツを提供します。
- 一貫性:アプリケーション全体でローカライズされたリンクを使用することで、ナビゲーションが現在のロケール内に留まることを保証し、予期しない言語の切り替えを防ぎます。
- 保守性:単一のコンポーネントにローカライズロジックを集約することで、URLの管理を簡素化します。
以下は、PreactでのローカライズされたLinkコンポーネントの実装です:
コードをクリップボードにコピー
import { getLocalizedUrl } from "intlayer";
import { useLocale } from "preact-intlayer";
import { forwardRef } from "preact/compat";
import type { JSX } from "preact";

export interface LinkProps extends JSX.HTMLAttributes<HTMLAnchorElement> {
  href: string;
}

/**
 * 与えられたURLが外部URLかどうかをチェックするユーティリティ関数。
 * URLがhttp://またはhttps://で始まる場合、外部と見なされます。
 */
export const checkIsExternalLink = (href?: string): boolean =>
  /^https?:\/\//.test(href ?? "");

/**
 * 現在のロケールに基づいてhref属性を適応させるカスタムLinkコンポーネント。
 * 内部リンクの場合、`getLocalizedUrl`を使用してURLをロケール(例:/fr/about)でプレフィックスします。
 * これにより、ナビゲーションが同じロケールコンテキスト内に留まることを確保します。
 */
export const Link = forwardRef<HTMLAnchorElement, LinkProps>(
  ({ href, children, ...props }, ref) => {
    const { locale } = useLocale();
    const isExternalLink = checkIsExternalLink(href);

    // リンクが内部で、有効なhrefが提供されている場合、ローカライズされたURLを取得します。
    const hrefI18n =
      href && !isExternalLink ? getLocalizedUrl(href, locale) : href;

    return (
      <a href={hrefI18n} ref={ref} {...props}>
        {children}
      </a>
    );
  }
);

Link.displayName = "Link";
Vite と Preact アプリケーションで Intlayer をセットアップするステップバイステップガイド
コンポーネントのコンテンツを抽出する
オプション既存のコードベースがある場合、数千のファイルを変換するのは時間がかかることがあります。
このプロセスを容易にするために、Intlayerは、コンポーネントを変換しコンテンツを抽出するための コンパイラ / エクストラクタ を提案しています。
セットアップするには、
intlayer.config.tsファイルにcompilerセクションを追加します。intlayer.config.tsコードをコピーコードをクリップボードにコピー
import { type IntlayerConfig } from "intlayer"; const config: IntlayerConfig = { // ... 他の構成 compiler: { /** * コンパイラを有効にするかどうかを指定します。 */ enabled: true, /** * 出力ファイルのパスを定義します。 */ output: ({ fileName, extension }) => `./${fileName}${extension}`, /** * 変換後にコンポーネントを保存するかどうかを指定します。これにより、コンパイラを一度だけ実行してアプリを変換し、その後削除することができます。 */ saveComponents: false, /** * 辞書キーの接頭辞 */ dictionaryKeyPrefix: "", }, }; export default config;コンポーネントを変換してコンテンツを抽出するためにエクストラクタを実行します
bashコードをコピーコードをクリップボードにコピー
npx intlayer extract
(任意)サイトマップと robots.txt(ビルド時生成)
Intlayer は generateSitemap と getMultilingualUrls により、クローラ向けに整形した多言語の sitemap.xml と robots.txt を public/ に自動で書き出せます。通常は Vite より前に小さな Node スクリプトを走らせます(例: npm の predev / prebuild)。
サイトマップ
Intlayer のサイトマップ生成はロケール設定を踏まえ、クローラ向けのメタデータを含めます。
生成されるサイトマップはxhtml:link(hreflang)をサポートします。単純な URL 列挙ではなく、各ページの言語版同士を双方向で結びます(例:/about、/fr/about、/about?lang=frなどルーティングに依存)。
Robots.txt
getMultilingualUrls で Disallow を、機微パスのすべての言語 URLに効かせます。
1. プロジェクトルートに generate-seo.mjs を置く
コードをクリップボードにコピー
import fs from "fs";import path from "path";import { fileURLToPath } from "url";import { generateSitemap, getMultilingualUrls } from "intlayer";const __dirname = path.dirname(fileURLToPath(import.meta.url));const SITE_URL = (process.env.SITE_URL || "http://localhost:5173").replace( /\/$/, "");const pathList = [ { path: "/", changefreq: "daily", priority: 1.0 }, { path: "/about", changefreq: "monthly", priority: 0.7 },];const sitemapXml = generateSitemap(pathList, { siteUrl: SITE_URL });fs.writeFileSync(path.join(__dirname, "public", "sitemap.xml"), sitemapXml);const getAllMultilingualUrls = (urls) => urls.flatMap((url) => Object.values(getMultilingualUrls(url)));const disallowedPaths = getAllMultilingualUrls(["/admin", "/private"]);const robotsTxt = [ "User-agent: *", "Allow: /", ...disallowedPaths.map((path) => `Disallow: ${path}`), "", `Sitemap: ${SITE_URL}/sitemap.xml`,].join("\n");fs.writeFileSync(path.join(__dirname, "public", "robots.txt"), robotsTxt);console.log("SEO files generated successfully.");intlayer がインストールされている必要があります。本番では環境変数 SITE_URL を設定してください(CI など)。
Node の ESM ではgenerate-seo.mjsを推奨します。generate-seo.jsにする場合はpackage.jsonの"type": "module"などで ESM を有効にしてください。
2. Vite より前にスクリプトを実行する
コードをクリップボードにコピー
{ "scripts": { "dev": "vite", "prebuild": "node generate-seo.mjs", "build": "vite build", "preview": "vite preview" }}pnpm や yarn を使う場合はコマンドを読み替えてください。CI から呼び出しても構いません。
TypeScriptを設定する
Intlayerはモジュール拡張を使用してTypeScriptの利点を活かし、codebaseをより堅牢にします。
TypeScript設定に自動生成型が含まれていることを確認してください。
コードをクリップボードにコピー
{ // ... 既存のTypeScript設定 "compilerOptions": { // ... "jsx": "react-jsx", "jsxImportSource": "preact", // Preact 10+推奨 // ... }, "include": [ // ... 既存のTypeScript設定 ".intlayer/**/*.ts", // 自動生成された型を含める ],}tsconfig.jsonがPreact用に設定されていることを確認してください。特にjsxとjsxImportSource、またはpreset-viteのデフォルトを使用していない場合は古いPreactバージョンのjsxFactory/jsxFragmentFactoryを設定してください。
Git Configuration
Intlayer によって生成されたファイルを無視することをお勧めします。これにより、Git リポジトリにコミットするのを避けることができます。
これを行うには、.gitignore ファイルに次の指示を追加できます:
コードをクリップボードにコピー
# Intlayer によって生成されたファイルを無視する.intlayerVS Code Extension
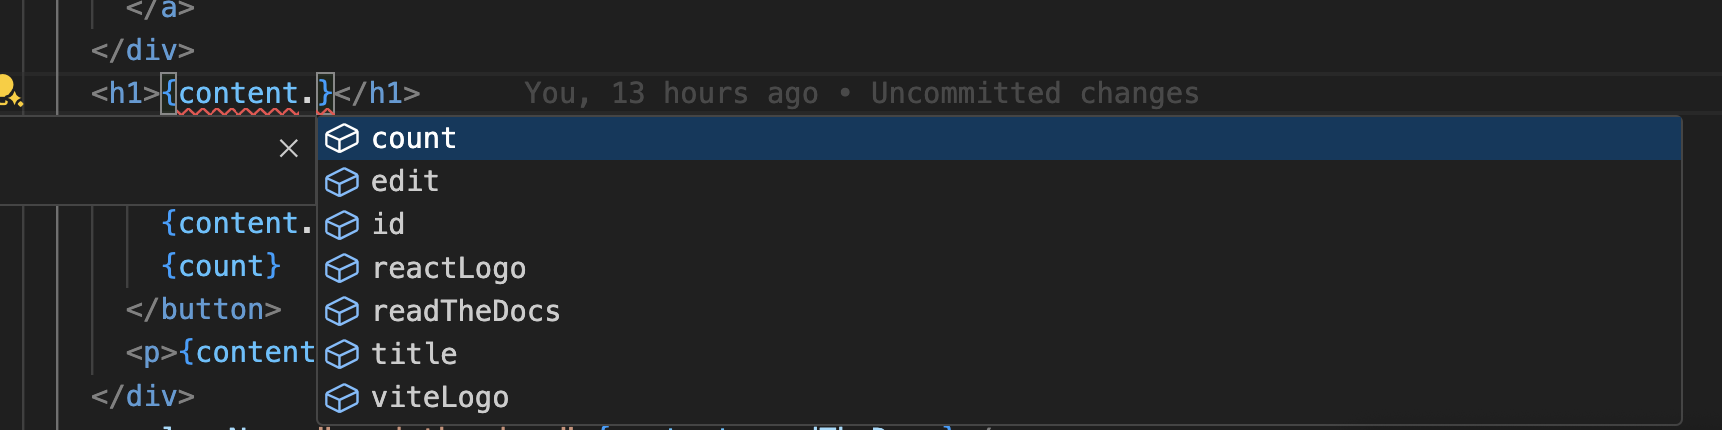
Intlayer での開発体験を向上させるために、公式の Intlayer VS Code Extension をインストールできます。
この拡張機能は以下の機能を提供します:
- 翻訳キーの 自動補完。
- 不足している翻訳に対する リアルタイムエラー検出。
- 翻訳されたコンテンツの インラインプレビュー。
- 翻訳の作成と更新を簡単に行うための クイックアクション。
拡張機能の使用方法の詳細については、Intlayer VS Code Extension ドキュメントを参照してください。
さらに進む
さらに進むには、ビジュアルエディターを実装するか、CMS を使用してコンテンツを外部化できます。